Showing posts with label jewellery. Show all posts

Thursday, October 18, 2012

Fusing - Eighth Technique Learnt This Year!

I am at number eight with my pledge (remember ?) - I took class to learn fusing silver. Again in my local bead shop Fusion Beads.
This was far the most expensive class I have done yet - not because of the tuition fees, but the cost of material. Fusing can be done only with pure silver (sterling doesn't work well, sometimes at all) so the wires I have purchased for this class totaled at almost $50! But I did learn to work with pure silver, how to handle a torch and lots of other tricks.

The easiest to start with is a simple chain and that's what was the objective of the class. I chose to make my links oval in shape and textured them with hammed (which you should be able to see on the second picture) before tumbling it. Have a look at the chain, I still need to purchase a clasp for it, but otherwise I am happy with the outcome. And I still have some wire left from the class, so when I buy a torch, I might make some more fused elements.


Wednesday, October 17, 2012

Wire-wrapped Big Jade Bead


My mum asked me to try to make something out of this beautiful jade bead she found somewhere. I am sorry I didn't take a picture with a coin or something else to show the scale, but when I see my mum again, I'll try to get a photo of her wearing it :) 


This is the pendant that I ended up with:


Sunday, October 14, 2012

Chainmaille - My First Project and Number SEVEN On My "Pledge List"

Seven - for some people a lucky number, for me it is right now another point on my "To Do List" done! I have learned seven NEW jewellery making techniques this year! Yes! 

Today on the menu: CHAINMAILLE (or chain-maille).
Chainmaille has always been intriguing to me - it can be tough and feminine at the same time, and it uses wire. Well - jumprings, but they're made from wire, so there are as many material choices as there are kinds, gauges and colours of wire.

The biggest accomplishment of "Mission Chainmaille" is the fact, that I made my own jumprings out of hardware wire! Very proud of myself. I tried to saw the jumprings first, but I broke one blade, so I have decided to cut them with flush cut pliers. I was just watching some movie and snipped away:)


My first project was a pair of earrings combined with copper washers of two different sizes. My inspiration came from magazine Step by Step Wire Jewelry (Jun-Jul 2011) from  tutorial by Lauren Andersen; but I would also like to give credit to Amy Sanders, who was the originator of the design and who also generously offers a FREE TUTORIAL on her blog here: http://www.crazymokes.com/2011/04/shenandoah-pendant-tutorial/

I discovered the online tutorial after working on this design and found it mainly because I was looking for who to give credits to.

OK, now here is the design:


And here are the finished earrings with earwires and after oxidizing.
There is only one problem with them: they are VERY heavy. Very heavy. So I will not try to sell them but keep them as a showpiece:)


Thursday, September 6, 2012

Foldformed Heart Bracelet

I found inspiration in the last issue of Step by Step Wire Jewelry magazine - Abbi Berta's design "Battered Heart" came just on time for my foldforming fever. This is Abbi's design:
Here is my version of the metal heart. I have added some hammered texture to the fold:


Wednesday, September 5, 2012

Foldforming - I'm at Number SIX Technique

Foldforming seems to be the latest craze in metal working world of jewellery!
In case you missed some of my earlier posts, I made a pledge to learn 12 new jewellery making techniques this year (this is the original post). With foldforming I am at number 6! Half way through!

"Ruegel Fold" looked the easiest to start with, so I tried to make 2 leaves - and I'm quite happy with the result!
Check out the colour magic (second picture) created by mini torch.


Friday, August 3, 2012

Fancy Clasp with Turquoise

A friend ordered a bracelet for his daughter (same design as here). I wanted to make a different style clasp this time, so I added a pair of small turquoise beads:


Thursday, August 2, 2012

Sawing OHM sign - Mixed Metals

Sawing is so versatile - it can expand the possibilities of design for anybody working with metal. You can cut ANY shape out of sheet metal and add it to your creations.
It was my very good friend's birthday and I wanted to make something special for her. She loves yoga and works as a massage therapist focusing on energy work - so I immediately thought OHM....

I made a pendant of mixed metals: hammered aluminum sheet, copper sheet and brass beads and rivets. All that hanging on a brass chain. She loved it!

Thursday, July 5, 2012

Chasing and Repoussé - Number Five

What does Wikipedia say about Chasing and Repoussé? Repoussé or repoussage is a metalworking technique in which a malleable metal is ornamented or shaped by hammering from the reverse side to create a design in low relief. Chasing is the opposite technique to repoussé, and the two are used in conjunction to create a finished piece. It is also known as embossing.
I took another class in the Fusion Beads here in Seattle, this time with the wonderful Janice Berkebile. We were actually learning two techniques - basket weave and repousse/ chasing.
The piece was called "Fruit of the Vine" and this is what the finished jewellery looks like (Janice's own piece):
Here you see a pod filled with beads/ pearls and a beautiful leaf forged out of metal sheet. The pod was a very nice and intricate weave to learn, but I was primarily interested in the repousse technique. Honestly, it took me FOREVER to get a nice leaf shape out of a piece of copper sheet, but once I was finished, I was feeling like a king! unfortunately this is something I wasn't able to replicate at home yet, because the chasing tools are very pricy and I will have to find a very good reason (or sell some of my handiwork) to be able to justify a buy like this. So for the time being, I am keeping my beautiful leaf for myself. And hopefully later on I will find that reason to invest into a bundle of chasing tools.

Here is my pod:


And here is the leaf I'm so damn proud of:

Saturday, May 26, 2012

More Sawing - Birdie Necklace

Here is a necklace I have created after seeing an episode of Portlandia called "Put a Bird on it!" I guess all the hype about birds on bags/ pillows/ jewellery .... is because a birdie is non-offensive! The case of dogs and cats could be always up for a debate - if you're a "cat person", a doggie ring might not make you happy and vice versa, however a birdie is just fine. Haha. That was just a thought.
And totally by chance, the second design I tried with saw was a bird too (see it here)!

The bird is copper, chains are antiqued brass and the beads are small faceted peridots.

Sunday, May 13, 2012

Sawing - Number Four Technique


I still remember the day when I spent $20 on metal shears in our local hardware shop... I was so excited that I would be able to cut ANY metal into ANY shape! But that didn't quite happen. While it was easy to cut very thin sheet metal and it was good mainly for straight lines, more complicated shapes were nearly impossible. And I knew that if I wanted to continue exploring metal, I shall learn to SAW!

And I did, again in a class in Fusion Beads. This class was tought by sweet Samantha Slater. Such a versatile and absolutely indispensable technique! My first attempt was a butterfly - I like the fact, that I can use the cut shape AND the shadow both. I would never be able to get the same result with the shears and I couldn't possibly get both shapes uniterrupted.


My second attempt, still in the class, was this birdie. I have put a nice rivet where the hole is and voila!

Saturday, May 12, 2012

Turquoise Set - Viking Knit Technique

Another bracelet I made with the Viking knit - I just bought these adorable turquoise beads (it's actually dyed magnesite of a brilliant colour!) - hexagon rondelles - and I want to use them in a thousand of designs!

The bracelet looks really nice on the wrist.


...and it comes with earrings!

Friday, May 11, 2012

My First Viking Bracelet

Here is my first finished design with the viking knit technique, a bracelet I made in the class with Tracy Stanley.
Copper wire and copper findings (handmade clasp:) and keshi pearls with handmade headpins.
Thanks Tracy! Such a great lesson! I can do it all by myself now! More coming...

Monday, May 7, 2012

New Technique Number Three - Etching

Another technique I was longing to learn was etching. It is one thing you should learn if you are planning to use lots of metal in your designs as it adds so many possibilities to jewellery. And it's especially nice to use it in designs that are supposed to have antique look. 

It seemed to be easy enough for me to try on my own. I read a step by step tutorial in an issue of Belle Armoire Jewelry - one of my favourite sources of desings - and bought a bottle of PCB Etchant in Radio Shack... easy it wasn't. I still don't know what went wrong with my first etching experiment, but this is what it looked like:


But as they say, don't give up! I didn't and tried it again. I swear it did everything exactly the same way as the first time and the result was just as I wished - beautiful deep etch of a butterfly!!! Yay!!!

And I kept trying with different scrapbooking stamps and it all worked well. I'm so glad I only ruined one piece of copper:) Now I need to think of a nice piece to use the etched metal in.

Friday, May 4, 2012

Second New Technique - Viking Knit

Fusion Beads have some great jewellery making classes and it took me WAAAAYYY too long to discover it. I always thought I will have to go to one of the big bead festivals to ne able to get a class, but then I realized that some of the most talented jewellery makers live right here in the Pacific Northwest. And what more - the same classes they teach at the festivals are available here in Fusion Beads for much less money and right in the neighbourhood!!!
So the first class I took was Basic Riveting, which rocked (it is documented here in the blog too) and the next class was Viking Knit with Tracy Stanley. Aaaaaawesome! I actually learned how to make a Viking Knit (you may say "That was the aim of the class", but with many classes you might be able to walk away with one finished piece, but not be able to recreate it at home).

See photos below:
Start of a new chain (I like the fact that even if the chain here looks irregular, it WILL be 'perfect' once finished):

And two finished chains - both are made with copper wire, one is oxidized, one is not oxidized yet. The oxidized one is also thicker and the shiny one is thinner - see, I can already experiment with different finishes!

I will soon post some finished products!


Friday, January 20, 2012

Copper Balled Headpins - this is addictive

Playing with fire is addictive - making ball head pins, that is! And the best of all (in my wide post-experiment eyes) is that I was able to make the copper heads RED! Yeeehaa!
My plan (call it New year resolution, if you will) is to try to explore more jewellery making techniques than I tried so far (until now it was mainly wire wrapping), so I can expand the possibilities of my designs.


Thursday, January 19, 2012

Layering Necklaces

I like layering necklaces and always combine some vintage ones I own with some new that I designed and made.  The possible combinations are endless and include necklaces of various lengths, or all same length, but different textures/ beads... Yuo get the idea. It's the best thing you can do, if you have simply one too many necklaces:)
Here is just an example of 2 necklaces of same lengths that go well together.
Both necklaces are desinged and made by me.


Wednesday, January 18, 2012

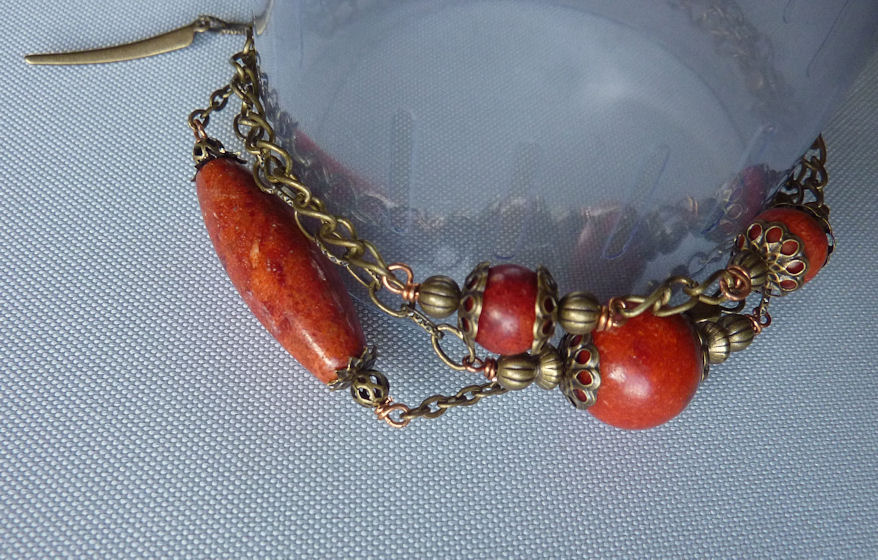
Brass and Coral Bracelet

Here is something I made for my mum before Christmas! My mum loves coral, so here is an overload.
Just an assembled bracelet with 3 sizes of coral beads and brass chain and details.


Thursday, October 6, 2011

Copper and pearls earrings

So couple days ago there were earrings with copper washers and pearls, here comes yet another design with copper and pearl combination. These earrings are wirewrapped - so far my favourite technique.

They were an order for my mum's friend - her ears aren't pierced, so I worked with leverbacks. The moment I put the photo on Facebook, another friend asked for the same design, for pierced ears. Nice networking:)


Sunday, September 18, 2011

Coiled Coils

This was one of the projects, that were not properly planned in advance, where I didn't know what I was looking for and just experimented and went with the flow...

It's one of my older works that I never saw worthy putting on the blog (that was until somebody bought it:) - please note that all the coiling was done before I discovered the "Coiling Gizmo".